


After long research, I finally got an implementation of an authentication workflow that I like. I think I researched this topic for more than a year (not extensively of course, but when I was seeing articles about auth, I would always save and read them). Please note that I don't think this implementation is perfect, but, for my use cases, it will work perfectly.
Part 1: Workflow
We are going to implement the following endpoints:
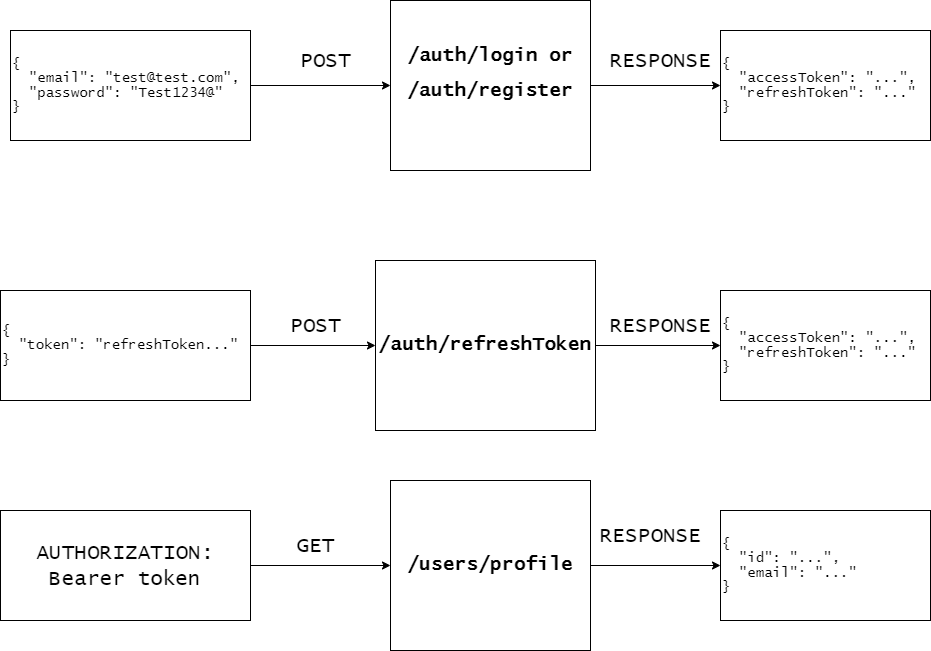
For /auth/login and /auth/register, the client needs to provide a user and a password in exchange for a pair of tokens ( access token and refresh token ).
With the access token, a request can be made to /users/profile. Here, the following workflow will be applied.
 Note: We only check if the token is valid. This way, we keep our workflow stateless. Because of that, the access token should expire fast ( 5/10 minutes ).
In order to keep the user logged in, the client needs to make a request to /auth/refreshToken containing the refreshToken received on register/login.
Based on that token, on the server we will make some checks and provide a new pair of tokens. The process is explained in the following diagram.

Now, let's move to the coding part.
Part 2 Code
The code for this implementation can be found here ( I usually just store the tokens in local storage. Just make sure your frontend logic is safe against XSS attacks). Also, if you want to send the refresh token by HTTP Only Cookie, you can check this branch.
Step 1: Create the app
When I write javascript code on the backend, I prefer to use a boilerplate made by Coding Garden. In order to use CJ's boilerplate, we can run the following code from the terminal.
npx create-express-api auth-server
cd auth-server
npm install
npm run dev
Now, you can test your server with a GET request on http://localhost:5000/api/v1/.
Step 2: Install dependencies and setup env variables
npm install -dev prisma
npm install @prisma/client bcrypt jsonwebtoken uuid
npx prisma init --datasource-provider sqlite
Add the following inside .env.
JWT_ACCESS_SECRET=SECRET123
JWT_REFRESH_SECRET=ANOTHER_SECRET123
Step 3: Prisma setup
Inside prisma/schema.prisma, we will define our database model. Paste the following.
model User {
  id            String         @id @unique @default(uuid())
  email         String         @unique
  password      String
  refreshTokens RefreshToken[]
  createdAt     DateTime       @default(now())
  updatedAt     DateTime       @updatedAt
}

model RefreshToken {
  id          String   @id @unique @default(uuid())
  hashedToken String
  userId      String
  User        User     @relation(fields: [userId], references: [id], onDelete: Cascade)
  revoked     Boolean  @default(false)
  createdAt   DateTime @default(now())
  updatedAt   DateTime @updatedAt
}
And run npx prisma migrate dev in the console.
Now, we have everything ready for writing our authentication logic.
We are going to use 2 tables. The user table is self-explanatory. The refresh token table is going to be used as a Whitelist for the tokens that we generate as explained in part 1.
Step 4: Add utility functions.
Create a folder called utils inside src. Here, we will add the following files:
- db.js - used for database interaction with prisma.
const { PrismaClient } = require('@prisma/client');

const db = new PrismaClient();

module.exports = { db };
- jwt.js - used for token generation.
const jwt = require('jsonwebtoken');

// Usually I keep the token between 5 minutes - 15 minutes
function generateAccessToken(user) {
  return jwt.sign({ userId: user.id }, process.env.JWT_ACCESS_SECRET, {
    expiresIn: '5m',
  });
}

// I choosed 8h because i prefer to make the user login again each day.
// But keep him logged in if he is using the app.
// You can change this value depending on your app logic.
// I would go for a maximum of 7 days, and make him login again after 7 days of inactivity.
function generateRefreshToken(user, jti) {
  return jwt.sign({
    userId: user.id,
    jti
  }, process.env.JWT_REFRESH_SECRET, {
    expiresIn: '8h',
  });
}

function generateTokens(user, jti) {
  const accessToken = generateAccessToken(user);
  const refreshToken = generateRefreshToken(user, jti);

  return {
    accessToken,
    refreshToken,
  };
}

module.exports = {
  generateAccessToken,
  generateRefreshToken,
  generateTokens
};
- hashToken.js - used to hash the token before saving it to the database.
const crypto = require('crypto');

function hashToken(token) {
  return crypto.createHash('sha512').update(token).digest('hex');
}

module.exports = { hashToken };
Step 5: Project structure
Delete the emojis.js from src/api and cleanup api/index.js by removing emojis route.
Create 2 folders: auth and users inside src/api. In each folder, we will create 2 files for routes and services.
 ┣ 📂src
 ┃ ┣ 📂api
 ┃ ┃ ┣ 📂auth
 ┃ ┃ ┃ ┣ 📜auth.routes.js
 ┃ ┃ ┃ ┗ 📜auth.services.js
 ┃ ┃ ┣ 📂users
 ┃ ┃ ┃ ┣ 📜users.routes.js
 ┃ ┃ ┃ ┗ 📜users.services.js
 ┃ ┃ ┗ 📜index.js
 ┃ ┣ 📂utils
 ┃ ┃ ┣ 📜db.js
 ┃ ┃ ┣ 📜hashToken.js
 ┃ ┃ ┣ 📜jwt.js
 ┃ ┃ ┗ 📜sendRefreshToken.js
Step 6: Services
Now, inside users.services.js paste the following code:
const bcrypt = require('bcrypt');
const { db } = require('../../utils/db');

function findUserByEmail(email) {
  return db.user.findUnique({
    where: {
      email,
    },
  });
}

function createUserByEmailAndPassword(user) {
  user.password = bcrypt.hashSync(user.password, 12);
  return db.user.create({
    data: user,
  });
}

function findUserById(id) {
  return db.user.findUnique({
    where: {
      id,
    },
  });
}

module.exports = {
  findUserByEmail,
  findUserById,
  createUserByEmailAndPassword
};
Most of the code is self-explanatory, but as a summary, we define some helpers specific to the User table that we are going to use in the project.
Now, the code for auth.services.js.
const { db } = require('../../utils/db');
const { hashToken } = require('../../utils/hashToken');

// used when we create a refresh token.
function addRefreshTokenToWhitelist({ jti, refreshToken, userId }) {
  return db.refreshToken.create({
    data: {
      id: jti,
      hashedToken: hashToken(refreshToken),
      userId
    },
  });
}

// used to check if the token sent by the client is in the database.
function findRefreshTokenById(id) {
  return db.refreshToken.findUnique({
    where: {
      id,
    },
  });
}

// soft delete tokens after usage.
function deleteRefreshToken(id) {
  return db.refreshToken.update({
    where: {
      id,
    },
    data: {
      revoked: true
    }
  });
}

function revokeTokens(userId) {
  return db.refreshToken.updateMany({
    where: {
      userId
    },
    data: {
      revoked: true
    }
  });
}

module.exports = {
  addRefreshTokenToWhitelist,
  findRefreshTokenById,
  deleteRefreshToken,
  revokeTokens
};
Now, we have everything in place to write our routes.
Step 7: Auth Routes.
Let's make the /register endpoint. Inside auth.routes.js put the following code:
const express = require('express');
const { v4: uuidv4 } = require('uuid');
const { generateTokens } = require('../../utils/jwt');
const {
  addRefreshTokenToWhitelist,
} = require('./auth.services');
// const jwt = require('jsonwebtoken');

const router = express.Router();
const {
  findUserByEmail,
  createUserByEmailAndPassword,
} = require('../users/users.services');

router.post('/register', async (req, res, next) => {
  try {
    const { email, password } = req.body;
    if (!email || !password) {
      res.status(400);
      throw new Error('You must provide an email and a password.');
    }

    const existingUser = await findUserByEmail(email);

    if (existingUser) {
      res.status(400);
      throw new Error('Email already in use.');
    }

    const user = await createUserByEmailAndPassword({ email, password });
    const jti = uuidv4();
    const { accessToken, refreshToken } = generateTokens(user, jti);
    await addRefreshTokenToWhitelist({ jti, refreshToken, userId: user.id });

    res.json({
      accessToken,
      refreshToken,
    });
  } catch (err) {
    next(err);
  }
});

module.exports = router;
Here, we take the email/password from the user. We make some basic validation ( you will need to add some validation steps here ( for example, use yup or joi ). We create the user, the tokens, and we add the refresh token to the whitelist ( check diagram 1 for the flow).
In order for the route to be recognised by our app, we need to add some code inside src/api/index.js:
const auth = require('./auth/auth.routes');
router.use('/auth', auth);
You can now test the endpoint by making a post request to http://localhost:5000/api/v1/auth/register. The response will be:
{
    "accessToken": "generatedAccessToken...",
    "refreshToken": "generatedRefreshToken..."
}
Let's move to the login endpoint. This one is very similar to the register one.
// add bcrypt at the top of the file.
const bcrypt = require('bcrypt');

router.post('/login', async (req, res, next) => {
  try {
    const { email, password } = req.body;
    if (!email || !password) {
      res.status(400);
      throw new Error('You must provide an email and a password.');
    }

    const existingUser = await findUserByEmail(email);

    if (!existingUser) {
      res.status(403);
      throw new Error('Invalid login credentials.');
    }

    const validPassword = await bcrypt.compare(password, existingUser.password);
    if (!validPassword) {
      res.status(403);
      throw new Error('Invalid login credentials.');
    }

    const jti = uuidv4();
    const { accessToken, refreshToken } = generateTokens(existingUser, jti);
    await addRefreshTokenToWhitelist({ jti, refreshToken, userId: existingUser.id });

    res.json({
      accessToken,
      refreshToken
    });
  } catch (err) {
    next(err);
  }
});
Now you can test the login endpoint by providing an existing user/password combination via a POST request to http://localhost:5000/api/v1/auth/login. If it is successful, you will get a response containing an access token and a refresh token.
Next, we will add the refresh_token endpoint and a test endpoint for revoking all tokens. Here is all the code for auth.routes.ts:
const express = require('express');
const bcrypt = require('bcrypt');
const jwt = require('jsonwebtoken');
const { v4: uuidv4 } = require('uuid');
const {
  findUserByEmail,
  createUserByEmailAndPassword,
  findUserById
} = require('../users/users.services');
const { generateTokens } = require('../../utils/jwt');
const {
  addRefreshTokenToWhitelist,
  findRefreshTokenById,
  deleteRefreshToken,
  revokeTokens
} = require('./auth.services');
const { hashToken } = require('../../utils/hashToken');

const router = express.Router();

router.post('/register', async (req, res, next) => {
  try {
    const { email, password } = req.body;
    if (!email || !password) {
      res.status(400);
      throw new Error('You must provide an email and a password.');
    }

    const existingUser = await findUserByEmail(email);

    if (existingUser) {
      res.status(400);
      throw new Error('Email already in use.');
    }

    const user = await createUserByEmailAndPassword({ email, password });
    const jti = uuidv4();
    const { accessToken, refreshToken } = generateTokens(user, jti);
    await addRefreshTokenToWhitelist({ jti, refreshToken, userId: user.id });

    res.json({
      accessToken,
      refreshToken
    });
  } catch (err) {
    next(err);
  }
});

router.post('/login', async (req, res, next) => {
  try {
    const { email, password } = req.body;
    if (!email || !password) {
      res.status(400);
      throw new Error('You must provide an email and a password.');
    }

    const existingUser = await findUserByEmail(email);

    if (!existingUser) {
      res.status(403);
      throw new Error('Invalid login credentials.');
    }

    const validPassword = await bcrypt.compare(password, existingUser.password);
    if (!validPassword) {
      res.status(403);
      throw new Error('Invalid login credentials.');
    }

    const jti = uuidv4();
    const { accessToken, refreshToken } = generateTokens(existingUser, jti);
    await addRefreshTokenToWhitelist({ jti, refreshToken, userId: existingUser.id });

    res.json({
      accessToken,
      refreshToken
    });
  } catch (err) {
    next(err);
  }
});

router.post('/refreshToken', async (req, res, next) => {
  try {
    const { refreshToken } = req.body;
    if (!refreshToken) {
      res.status(400);
      throw new Error('Missing refresh token.');
    }
    const payload = jwt.verify(refreshToken, process.env.JWT_REFRESH_SECRET);
    const savedRefreshToken = await findRefreshTokenById(payload.jti);

    if (!savedRefreshToken || savedRefreshToken.revoked === true) {
      res.status(401);
      throw new Error('Unauthorized');
    }

    const hashedToken = hashToken(refreshToken);
    if (hashedToken !== savedRefreshToken.hashedToken) {
      res.status(401);
      throw new Error('Unauthorized');
    }

    const user = await findUserById(payload.userId);
    if (!user) {
      res.status(401);
      throw new Error('Unauthorized');
    }

    await deleteRefreshToken(savedRefreshToken.id);
    const jti = uuidv4();
    const { accessToken, refreshToken: newRefreshToken } = generateTokens(user, jti);
    await addRefreshTokenToWhitelist({ jti, refreshToken: newRefreshToken, userId: user.id });

    res.json({
      accessToken,
      refreshToken: newRefreshToken
    });
  } catch (err) {
    next(err);
  }
});

// This endpoint is only for demo purpose.
// Move this logic where you need to revoke the tokens( for ex, on password reset)
router.post('/revokeRefreshTokens', async (req, res, next) => {
  try {
    const { userId } = req.body;
    await revokeTokens(userId);
    res.json({ message: `Tokens revoked for user with id #${userId}` });
  } catch (err) {
    next(err);
  }
});

module.exports = router;
The /revokeRefreshTokens should not be exposed in the api. You should call the revokeTokens method only in a specific case where you would like to invalidate all the tokens ( ex: password reset ).
As for the refresh_token endpoint, it is used to get another pair of tokens, in order to keep the user logged. We check if the sent refresh token is valid and if it is in our database. If those conditions are met, we invalidate the previous refresh token and generate a new pair of tokens.
Step 8: Protected Routes.
First, in order to protect our routes, we need to define a middleware. Go to src/middlewares.js and add the following code:
function isAuthenticated(req, res, next) {
  const { authorization } = req.headers;

  if (!authorization) {
    res.status(401);
    throw new Error('🚫 Un-Authorized 🚫');
  }

  try {
    const token = authorization.split(' ')[1];
    const payload = jwt.verify(token, process.env.JWT_ACCESS_SECRET);
    req.payload = payload;
  } catch (err) {
    res.status(401);
    if (err.name === 'TokenExpiredError') {
      throw new Error(err.name);
    }
    throw new Error('🚫 Un-Authorized 🚫');
  }

  return next();
}

module.exports = {
    // ... other modules
    isAuthenticated
}
We check if the client sends an Authorization header. The format should be: Bearer token. If the token is present, we verify it with our secret and add it to the request so it can be accessed in the routes.
NOTE: We only check if the token is valid. This way, we keep our workflow stateless. Question: What happens if the user is deleted or the refresh tokens are invalidated? Answer: The user will still have access until the access token expire. This will be for a maximum of 5 minutes ( that's why our access tokens expire fast). In my opinion, this will suit most of the apps ( Of course, if you develop a banking app, it might not work. But for most of the apps, it will be alright. For example, imagine you build an app that has some free and premium content. The user pays you for 30 days of premium content. After 30 days, you will decrease his access, but if he already had a token, he will still be able to access the content for 5 more minutes. Will be worth it to check the database on each call for each user inside our middleware? In my opinion, not. But as I said, depends on your use case.
Now, let's write the protected route. Go to src/api/users/users.routes.js and add the following code:
const express = require('express');
const { isAuthenticated } = require('../../middlewares');
const { findUserById } = require('./users.services');

const router = express.Router();

router.get('/profile', isAuthenticated, async (req, res, next) => {
  try {
    const { userId } = req.payload;
    const user = await findUserById(userId);
    delete user.password;
    res.json(user);
  } catch (err) {
    next(err);
  }
});

module.exports = router;
And inside src/api/index.js:
const users = require('./users/users.routes');
router.use('/users', users);
Now, you can make a GET request to http://localhost:5000/api/v1/users/profile. You will need to add an Authorization header with the access token that you got from the /login endpoint.
And that's it.🎉🎉🎉 If you have any questions, feel free to reach up in the comments section.